|
|
Post by silversanjuan on Mar 23, 2013 23:19:39 GMT -5
Good news on the hydro test. Stinks about the check valves though. I'm sure you'll get it sorted.
|
|
|
|
Post by kvom on Mar 24, 2013 19:02:33 GMT -5
After disassembling the check valve, I discovered that it's designed to work only in the vertical position, with gravity closing the internal valve element. There are two problems with using the valve this way. First, I would have to trim the walk boards to clear the valve itself. Second, the water pipe would need a fairly sharp curve down and then up to clear the yoke.
The best solution appears to be to use a horizontal check from PMR. I will be at Cabin Fever in 3 weeks, so I'll source the needed parts when there. In the meantime I'll try to finish the water supply side of the injectors.
|
|
|
|
Post by kvom on Mar 27, 2013 18:04:26 GMT -5
Got a delivery from McMaster, so started piping in the smokebox. Here's the result for the steam delivery:  Kozo just has the delivery pipe off to one side, while this boiler has it centered. The elbows are thus needed to clear the petticoat. I used compression fittings and 3/8" OD tube as per Kozo's spec., but I'm not sure how easy it will be to remove and reinstall with the smokebox present. The tube is quite stiff, and will need to flex a bit to allow the compression nuts to be threaded on. I'm thinking I'll anneal the tube after I take it off. I have the beginnings of a blower pipe done. Using 1/4" OD tube through the hollow stay with a compression fitting in the smokebox end. Still not sure how to construct the blower component past the fitting, as I've seen several options. On the backhead side I'll have a union that will allow the pipe to be pulled out from the front if needed. I have a Locoparts globe valve for the blower. Looking at how to connect it between the blower pipe and the turret. I reinstalled the turret and throttle to check for possible routing and have some ideas; looks as if an elbow on the bottom of the turret is the best connection point. |
|
|
|
Post by kvom on Mar 29, 2013 15:30:27 GMT -5
I spent the afternoon in the shop building the blower nozzle, based on one I saw at Bob Harpur's shop a while back. Here are the components:  The "body" was made from some 1.25' round brass bar, the top from 1/8" sheet; the inlet is a 1/16NPT to 1/4" tube adapter from Locoparts. The exhaust holes are 1/16". Assembled with 5-40 screws:  And positioned on the exhaust nozzle: 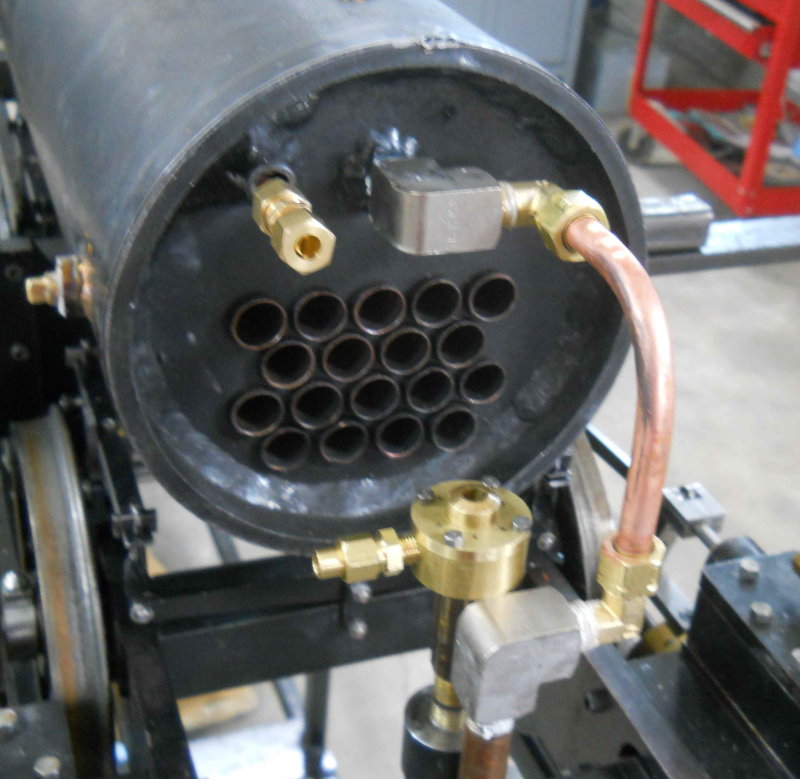 Bending and soldering the copper tube is for the next time. I also annealed the steam delivery tube, and that made it much easier tore-install. |
|
|
|
Post by kvom on Apr 7, 2013 13:48:31 GMT -5
Little bit of work recently. I remade some parts of the throttle control to make it a tighter assembly, and also drilled/tapped a hole in the bottom right side to supply the blower. I'll get some fittings at Cabin Fever next weekend from PMR to attach this supply and a globe valve to the blower tube shown in the photo:  The hole on the left side of the turret will supply the steam whistle eventually. I still need to figure out the placement and supply to the pressure gauge. I also managed to get the supply tube bent for the blower in the smokebox.:  The bender I'm using doesn't make sharp radius bends, so it took a bit of trial and error, plus annealing the tube to get it to fit and stay within the smokebox boundary. |
|
|
|
Post by silversanjuan on Apr 8, 2013 9:55:09 GMT -5
Stellar work! Do you think you'll be steaming her by summer time?
|
|
|
|
Post by kvom on Apr 14, 2013 11:22:17 GMT -5
Just returned from Cabin Fever with a few goodies for the loco. Sack of fittings from PMR to help finish the piping. I also exchanged the Locoparts water glass for the shorter version; this will stick up less high and make piping it to the boiler less convoluted. I also arranged with Railroad Supply to take back the bell casting kit I bought from them last year as partial payment for their castings for the front lantern. Because of the spacing error on the steam dome, I won't be mounting a bell on the boiler.
Since I flew up this year I wasn't tempted to bid on anything at the auction. I did buy a 0-1/2" Albrecht keyless drill chuck on a MT2 shank that should handle most things on my lathe tailstock. Up til now I've been switching between a 0-5/16 keyless chuck and a 1/8-3/4 keyed chuck, the latter with a worn shank that holds less well than I would like.
I also picked up some 32 tpi hacksaw blades; these fine blades are best for cutting copper tube and leaving little if any burrs.
Finally I bought a package of the 5 issues of Digital machinist that describes construction of the gearless clock thatr a couple of people I know are building. This looks like a good project to do that won't take much time and can be pursued when engine building gets tedious.
|
|
|
|
Post by Harlock on Apr 15, 2013 0:42:13 GMT -5
The Albrecht is an excellent chuck and that's what I have on my full size bridgeport clone. It's worked out far better than the Enco chucks I had been using prior.
|
|
|
|
Post by kvom on Apr 16, 2013 16:49:32 GMT -5
A bit more progress today. First, disassembled the smokebox piping and placed the saddle and smokebox back on the engine. In the past I kept the saddle and smokebox assembled, put them over the tee, and then pushed the boiler tube into the smokebox. With the boiler already in place, I decided to place the saddle on first, and then try to slide the smokebox over the boiler and then re-attach. Still took some effort, but I got there in the end. The assembly of the smokebox innards went pretty easily. The two pipe compression joints were easy to line up and accessible (I had left the boiler ends attached). I needed to use a socket on an extension to screw in the nozzle through the stack opening.  Then I was able to get the top pipe on the glass connected to the boiler. I had cut off a piece of copper tube using #1 eyeball to measure, expecting to trim it, but it ended up fitting as is. What were the chances? Only had to anneal it once to get it bent correctly.  I had been planning to make the water supply run from the injector to the boiler today now that I have horizontal check valves. However, the local Ace hardware was out of 1/8 elbows, plus I'll need a 1/8-1/16 reducing bushing. So I ordered some more stuff from McMaster and called it a day. |
|
|
|
Post by kvom on Apr 17, 2013 18:45:24 GMT -5
Bit more progress today after UPS delivered some fittings from McMaster:  Not the prettiest job of tube bending. |
|
|
|
Post by kvom on Apr 21, 2013 8:19:03 GMT -5
I had a bit of a disaster yesterday; I transported the loco sans tender to the club as a "show and tell" for a guest run day, and on the way back the loco broke free of its restraints in the truck. It didn't derail but rolled back and impacted the tailgate with the rearmost part, the sight glass. No other damage but the glass is toast. So an expensive lesson and a project to use better hold-down strategy.
|
|
|
|
Post by kvom on Apr 23, 2013 15:55:05 GMT -5
Spent 6+ hours in the shop working on piping issues. After a few different tries, I ended up with this for the injector water supply:  To get the barb sufficiently above the track I needed to make a 1/16M x 1/8F adapter from some 7/16 hex bar (dark brown fitting). The flexible hose will only be a few inches long to connect to the tender's hose barb. The turret is finished for the time being.  I ordered a different pressure gauge from McMaster, one with a 1/8NPT connection. This one has 1/4NPT, and necking it down with fittings makes it too high and too heavy. I moved the water gauge connection to the rear boiler connection and used the front for the gauge. When the replacement water gauge arrives I'll need to redo the upper pipe. The tee pipe from the left of the turret is for hooking up the steam whistle with an extra port in case I add something later, such as steam operated cylinder cocks. Assuming that the water gauge and pressure gauge arrive this week, I need only hook them up and do the piping for the lubricator to be ready to fire the boiler, possibly this weekend. I also need to up work on the tender for the left side water supply. |
|
|
|
Post by silversanjuan on Apr 24, 2013 7:55:23 GMT -5
Nicely done! Hope to hear a steaming report this weekend.  |
|
|
|
Post by kvom on Apr 27, 2013 15:58:10 GMT -5
Fired the boiler for the first time at the CSP&P track roundhouse. Thanks to several fellow club members who provided, in addition to advice, kindling, coal, a coal scoop and poker, and load of a stack blower. It took a while to get pressure up, but eventually the needle came off the bottom. Things that worked well: 1) The 100 psi safety let loose with the pressure gauge reading 100. 2) Superscale economy injector fed water into the boiler from the tender 3) Steam blower worked very well I wanted to move the engine under steam to the turntable and back. But when the engine had moved about 3 feet the gasket between the throttle tube and the turret let loose and I lost all the steam pressure. We quickly dumped the fire and called it a day, time for lunch. I didn't take any pics myself, but some fellow members and friends got a few. I'll post some when they mail them to me. Things that need fixing: 1) The throttle-tube.turret junction. I was actually most worried up front on this since if the connecting bolts are really torqued down they squeeze the gland (o-ring) around the throttle rod too tight. 2) The SS grate is a tad too long and expanded so that the grate was tight in the firebox. This made raking out the fire awkward. I'll take a bit off each grate bar for the next time out. 3) One of the Locoparts blowdown valve leaks a bit Here's a photo a friend shot:  |
|
|
|
Post by kvom on May 15, 2013 10:51:54 GMT -5
Been a while since the last update, but I haven't been entirely idle. I re-jiggered the connection between the throttle tube and the turret to use separate bolts from those for the gland. With a new gasket in place I can tighten down the connection without making the gland too tight as well. 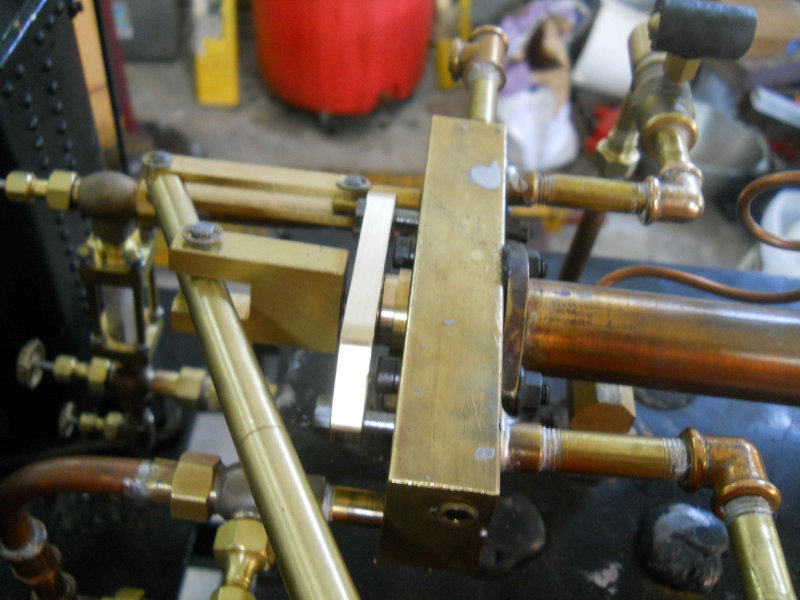 I also piped the right side injector.  My tender didn't include a water valve on the right side, so I've been working to supply one. Everything is in place except for the need to make a long spindle on the valve. That work has been sidelined by need to work on my Jeep in preparation for a trip to Moab, Utah next week. So no more progress until June. Other than that I do need to prime the lubricator before attempting a second steam up. |
|


