|
|
Post by phutcheson on Nov 10, 2010 12:01:07 GMT -5
Congratulation ... when do you expect delivery? 
For the handrails I used 3/32" (.094") SS303 from McMaster Carr p/n 8891K39 in 3' length. It worked great no problems.
The tubing for the hand pump I got from a local hobby shop, I used 5/32" OD it's a little thin, so I might change it to SS later on.
Pat H.
|
|
|
|
Post by ramkitty on Nov 12, 2010 12:09:10 GMT -5
I do not know I had to complete a power of attorney form for importation. I live in victoria bc and it comes from Bellingham which is only 100km 60 miles away. Yesterday was a stat for both of us so if they process it today and it gets picked up I think it will take maybe 5-10 days. I will take pictures of this for sure.
|
|
|
|
Post by ramkitty on Nov 16, 2010 21:02:41 GMT -5
I received shipping notice last night for the mill and the delivery date is tomorrow. I have to give ups one thing, they are super fast. It is a shame that their 'brokerage' (thieving) fees are soo out to lunch. I guess I have to figure out how to lift the stupid thing now.
More progress today too. I prepped all the parts for the rear coupler just need to slit and solder, made the drawbar and prepped the rear footboard. These parts are so much easier to make than the axles, journal boxes and such. I received the boring bars I was waiting for so I will go back and finish the trucks and the bending jig soon after a little more experience on these easy parts. I will solder the footboard and coupler pocket before the columns since they dont have any critical dimensions. I tapped my first 0-80 hole, was quite nervous but the brass has a good feel and doesnt grab at all. No problems. I also ordered most of the reamers (no 9/16 which seems to only be used once and is very expensive) that I needed and a 2-56 tap I forgot to buy despite buying the screws. I dont know if I need all of these taps and screw sizes but I cut back on the lengths I will file some down if needed.
I could have used the new mill today too. I am very rapidly learning the troubles and limits of the combo mill/lathe. The bed is too far from the head. I currently have a milling vice on the 2 of a pair of 123 blocks and most of the small parts that I have been working on have been reachable with a end mill but with a fairly extended quill. The slitting saw however would not reach the vice so once again I would have to re-do the setup.. ugh cant wait to get my mill cleaned and ready. Then I will have a second tool that I can set up for either job. Pictures will come with the the new mill. I have to figure out how to tram properly now too.
|
|
|
|
Post by ramkitty on Nov 18, 2010 21:27:55 GMT -5
I made the foot board. I made some brass jaws for my pana vise and made the bending jig for it. I had some issues bending a 90 on the 3/32" for the foot board brackets. I had to anneal them and it still took lots of effort. I then did my first silver soldering job. It took a lot more heat than I thought it would. I need to increase the concentration of the acid bath, use more silver solder and water down the flux a little more and use more. I also had some difficulty lately. Broke a 37 drill in the work, broke the smallest sized center drill in the work an and broke an 0-80 tap. I need to pay more attention to what i am doing especially as I bottom out. I also ruined the first foot board bracket I bent. I marked and bent the board at the hight minus the thickness of the stock and it ended up too short. I ended up just bending at a higher length mounted the foot plate and cut and filed the top and bottom of the brackets to fit.
and still no new mill. Customs is having fun with it I guess.
|
|
|
|
Post by Harlock on Nov 19, 2010 20:16:41 GMT -5
Regarding taps: that's one area where you want to spend good money to get good taps. The cheap ones break much more easily. All of this points to "sloooow down"  think carefully before you act...most of the time spent in machining is setup and calculation. Your new mill will help a lot, because then you won't also be fighting the tool. I have given up on using my HF Mini Mill due to inaccuracies mostly on Z that are inherent in the machine, after consulting with other owners. I will probably upgrade to an RF-45 clone, a large square column bench top mill. Still quite happy with my 9X20 Enco lathe though, for small scales work. -Mike |
|
|
|
Post by GregMiller on Nov 20, 2010 13:40:34 GMT -5
I have had really good luck with the taps that American Model Engineering Supply sells. I had tried 0-80 taps from other suppliers and found that the broke easily. www.americanmodeleng.com/Greg |
|
|
|
Post by ramkitty on Nov 26, 2010 14:16:06 GMT -5
received my mill, its now set up, ran through the break in. I found I had to mill all the t-nuts from the clamp kit I got  so that is done. The mill is super smooth and it cuts fast. I have noticed that the tormach tooling needs the drawbar to be very tight and it does torque over with deeper cuts causing it to work deeper. I will keep an eye on that but with brass I dont know if it will come up as an issue. I just started back on the trucks, cutting the arch bar materials and milling it to thickness. I will then slot the coupler pocket and finish it then finally back to the lathe to finish the axles and journal boxes before finishing the trucks on the mill. edit: I got the coupler pocket 90% complete, all soldering is done, I have to cut the angle and round the front and finish with the pin hole. what is a good way to fill a hole. Like a screw hole that wasnt used (the tap broke in it) I could silver solder it again but I was having problems with the flux pushing out the screw |
|
|
|
Post by ramkitty on Nov 29, 2010 23:37:07 GMT -5
|
|
|
|
Post by phutcheson on Nov 30, 2010 0:35:19 GMT -5
Awesome ....
Really like your new toy and the pictures.
Couldn't find the hole ... so can you tell us more about it?
What was hole for?
Do you want to re-drill in same place?
Is tap removed?
etc...
I have had to fill in holes, but the method depends on what you want to do after the fix.
Pat H.
|
|
|
|
Post by ramkitty on Nov 30, 2010 16:25:45 GMT -5
 bottom right it was for a screw to hold it together, something broke in the part where the threads go and I couldnt remove it (soo small) so I screwed half of it and clamped the other half. Worked well for the soldering but the screw was pushed out (i tried to use it as a filler bar) You may be able to see a little bit of material in the hole, I was thinking of taping the little bit of material and putting another screw in and solder/file. otherwise I am not sure, I cant go too deep since the hard tool steel is still behind. Overall I am pleased with how my silver soldering has gone on this item the only questionable part is the bottom piece the seam is visible. I didnt have enough solder as half of the joint is visible. If I look closely at it though it is filled just not flush with the surface. 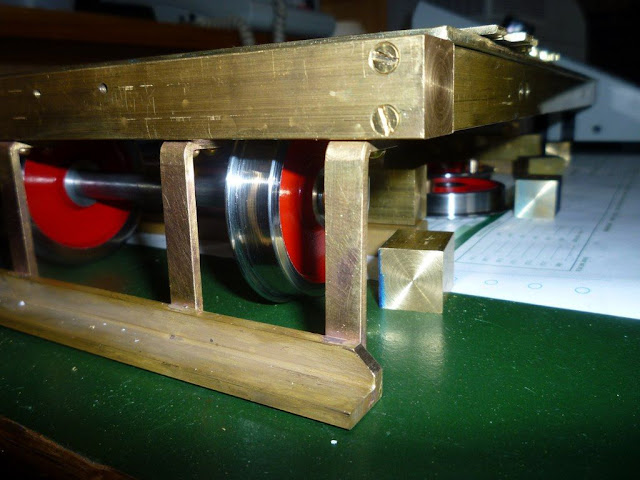 |
|
|
|
Post by trainlarry on Nov 30, 2010 20:23:40 GMT -5
Ramkitty,
Thanks for your commentary and pictures on your A3 build.
To remove a broken tap or drill bit from any non-ferrous material, get some Alum powder from your local supermarket spice rack. Heat up enough water to cover the part in a non-metallic bowl to just below boiling. Add enough Alum until no more will dissolve in the water. Add the part, and you will see bubbles rising from the broken tap. Keep the water warm, and in 1/2 hour or so, the tap will be mush, and dissolved out. The part will not be affected by the Alum.
To minimize tap breakage, get a Walton #176 piloted tap wrench. You will wonder how you ever tapped without it.
Larry
|
|
|
|
Post by ramkitty on Dec 1, 2010 19:49:21 GMT -5
wow, thanks good info. Am I able to reheat a silver solder joing to reposition it working on the steps it said no support required, well I guess I milled a slot slightly too large and it shifted during heating. Can this be reheated and worked into place? |
|
|
|
Post by kvom on Dec 1, 2010 22:38:02 GMT -5
yes!
|
|
|
|
Post by trainlarry on Dec 2, 2010 19:42:34 GMT -5
Ramkitty,
Before reheating a silver soldered joint, make sure it is clean by pickling it, and cleaning the joint under running water with a brass wire brush. Apply fresh flux to the joint before reheating it. Use a thin, pointed rod to reposition the parts after you see the solder melt.
Watching the part to make sure all the solder stays molten, and repositioning the parts at the same time can get tricky, so be patient.
Larry
|
|
|
|
Post by ramkitty on Dec 2, 2010 20:33:54 GMT -5
I already did. I pickled rinsed/brushed. Heated then used a hammer to give a quick smack. It worked well.
I also did all the soldering for the front steps. I think I could have made them a little better, one has a slight cant and the bends were not as crisp as I would have liked. I wil have to play around with bending more.
All that remains on the frame is to do the final shaping of the steps, drill the holes in the step and step brackets, tap and mount. Then back on to the axles and trucks.
|
|


 think carefully before you act...most of the time spent in machining is setup and calculation. Your new mill will help a lot, because then you won't also be fighting the tool. I have given up on using my HF Mini Mill due to inaccuracies mostly on Z that are inherent in the machine, after consulting with other owners. I will probably upgrade to an RF-45 clone, a large square column bench top mill. Still quite happy with my 9X20 Enco lathe though, for small scales work.
 so that is done. The mill is super smooth and it cuts fast. I have noticed that the tormach tooling needs the drawbar to be very tight and it does torque over with deeper cuts causing it to work deeper. I will keep an eye on that but with brass I dont know if it will come up as an issue. I just started back on the trucks, cutting the arch bar materials and milling it to thickness. I will then slot the coupler pocket and finish it then finally back to the lathe to finish the axles and journal boxes before finishing the trucks on the mill.