|
|
Post by GregMiller on Apr 23, 2009 10:29:20 GMT -5
Hello, I have officially started my A3a Switcher in 3/4" scale! And where did I start, you might ask? Poling Pockets of course! 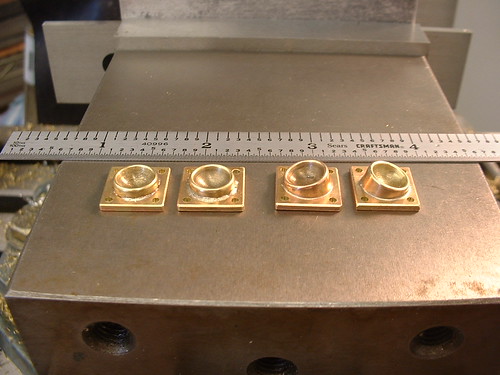 The 2 on the left are for the Front Bumper and the 2 on the right are for the Rear Foot Plate. The left parts might get remade as the soldering is a little rough, too much heat. I used a smaller torch tip on the poling pockets on the right and am very pleased with the results. I did not realize how small these parts were until I started boring the 10mm hole in the 0.55" square plates. Here are a couple of screen shots from the 3D Model. Front Bumper 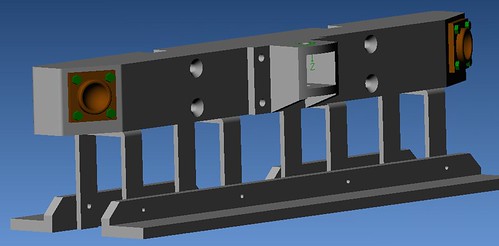 Rear Foot Plate 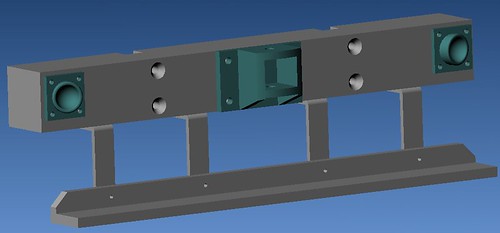 |
|
|
|
Post by Bill Holland on Apr 23, 2009 12:47:57 GMT -5
Nice work! I was thinking about making an A3a along side the regular A3. I think the tank loco would be even better.
|
|
|
|
Post by dampfmann on Apr 23, 2009 19:44:07 GMT -5
What are the major differences between the A3 and A3a?
|
|
|
|
Post by Bill Holland on Apr 23, 2009 22:49:47 GMT -5
a3a has no tender, it has a saddle tank.
|
|
|
|
Post by Harlock on Apr 24, 2009 0:05:38 GMT -5
That'll be neat to see!
|
|
|
|
Post by grege on Apr 24, 2009 6:44:21 GMT -5
Hi Greg,
Looks like a good start!
I'm building an A3a also, so its great to see another get started. I'm partway through the valve gear and rods right now, and got to skip past all the work on that pesky tender... ;D
|
|
|
|
Post by gearedloco on Apr 24, 2009 14:50:13 GMT -5
It would be nice if someone would put a photo or two of the prototype in the photos area. I can't recall ever seeing a picture of the prototype.
-bill
|
|
|
|
Post by Harlock on Apr 24, 2009 14:59:10 GMT -5
It would be nice if someone would put a photo or two of the prototype in the photos area. I can't recall ever seeing a picture of the prototype. -bill quick Google search found this:  From: prrsteam.pennsyrr.com/Looks like it's cold on a dead line with stuff missing, waiting for scrapping... |
|
|
|
Post by grege on Apr 25, 2009 13:20:05 GMT -5
Thanks Mike - that's the best photo I've been using to help design the tank and rear bunker. I also used a line drawing from the Kalmbach locomotive cyclopedia. This is the photoshop overlay I did to help with design- the A3 is in black and the A3a in red: 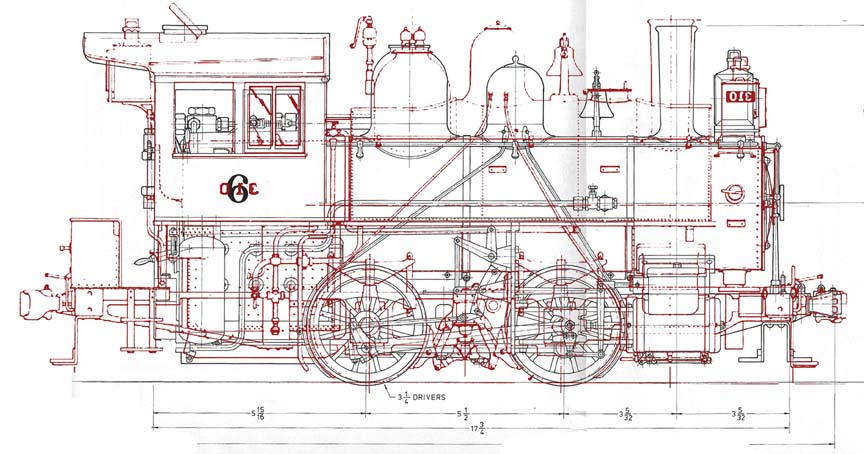 |
|
|
|
Post by GregMiller on May 5, 2009 22:42:10 GMT -5
All, I have made more progress over the past couple of weeks. Foot boards and brackets trial fit is shown below. Ready to make Front and Rear bumpers so I can get these soldered. 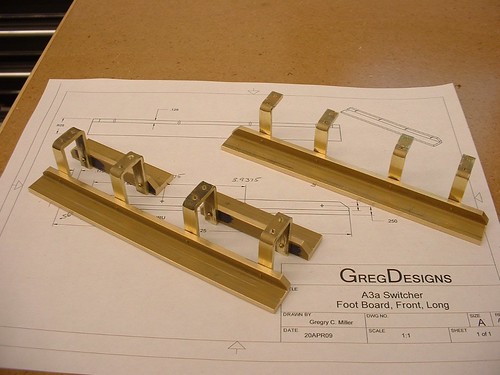 More pictures are available on Flickr if you follow this link: www.flickr.com/photos/gregrycm/sets/72157617220730278/Thanks for the previous comments, they are appreciated. Greg |
|
|
|
Post by jeff02 on May 10, 2009 8:20:13 GMT -5
Beautiful work Greg.
I to have started this endeavor, I started with the tender pump and tender frame.
Please keep the pictures coming as they keep my fire stoked!
|
|
|
|
Post by srebot on May 17, 2009 17:22:21 GMT -5
Dear members:
I will like to know If someone can help me in order to get a complete set of plans, for building the A3 Switcher.
Thank you very much.
|
|
|
|
Post by Dan Rowe on May 18, 2009 12:21:46 GMT -5
To obtain a set of plans simply google "The Pennsylvania A3 Switcher" which is the book that has the plans and instructions by Kozo Hiraoka.
Dan
|
|
|
|
Post by Harlock on May 18, 2009 13:46:49 GMT -5
|
|
|
|
Post by GregMiller on May 25, 2009 22:08:38 GMT -5
All, Memorial Day Weekend allowed me 2 day in the shop, although it does not seem that I have much to show for it. I worked on the Cab Steps and the Coupler Pockets, since similar material and operations were used on both. All of the blanks were rough cut on the band saw, then milled to desired dimension, often in sets, then flat filed to remove the mill marks. Holes were drilled for the 0-80 fab brass screws, and 2 0-80 taps were broken while tapping the holes in the steps. More taps are on order, I am hoping that an American made tap costing $7.50 will out perform one from over seas that cost $2.50. I remember when I used to think that a 4-40 was small tap! I would like to hear from others regarding the amount of time that you spent fabricating similar parts, such as the couplers. Status of the Cab Steps:  Status of the Coupler Pockets: 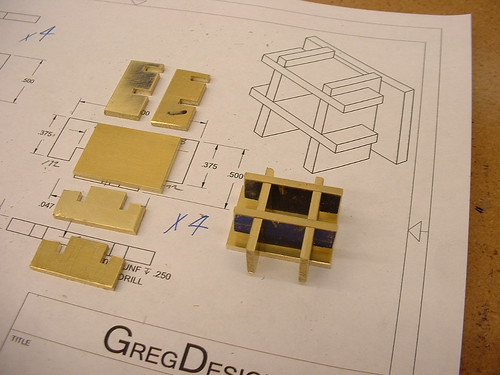 Thanks for your comments |
|


