|
|
Post by kenrinc on Jul 23, 2010 10:57:17 GMT -5
Just thought I'd pass along some pics of parts of my 1.5" A3 I'm working on. Frame, spring rigging, axles, drivers, pins, cylinders and yoke are all done and the chassis is now painted. Currently working on main rods and some misc stuff so that I don't have to take the frame apart for the 35th time! Enjoy... Roughed out cylinder workpieces  Guide yokes  Finished drivers  Drivers, axles and pins  Frame 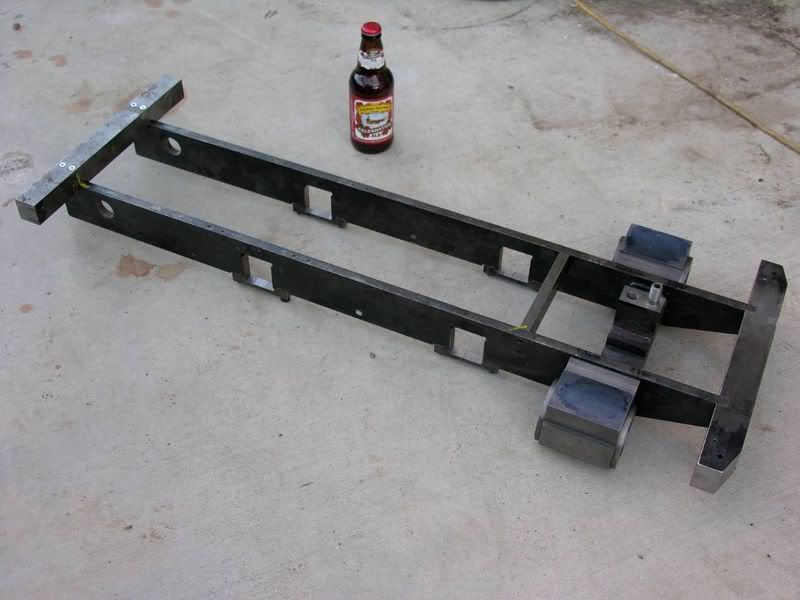 Ken |
|
|
|
Post by pkastagehand on Jul 23, 2010 11:02:49 GMT -5
Lookin' great!
I'm just a few pins and the packing glands away from trying mine on air (3/4" scale).
Paul
|
|
|
|
Post by kenrinc on Jul 23, 2010 12:28:20 GMT -5
Lucky dog. Love to hear what you did with the packing. Did you do the O-ring thing? I was disappointed to find out that O-rings are not standardized like Kozo says they are in his excellent O-ring article in the New Shay book. I've bought 3 sets of O-rings and they are all the same "reference" size but not physically. Some don't touch the sides of the bore others won't fit in at all. And it's not at all easy to actually physically measure an O-ring.
Ken
|
|
|
|
Post by pkastagehand on Jul 24, 2010 16:37:46 GMT -5
I haven't actually done much about that yet. I did buy some o-rings awhile back but I haven't made the glands so don't know how they'll fit or work. So I may run into the same trouble.
Paul
|
|
|
|
Post by kenrinc on Jul 28, 2010 10:38:33 GMT -5
Another pic of the progressing cylinder workpieces. These started out as 4" dia pieces of durabar! Thank god I had my mill/drill cause I totally underestimated how big these would be!  After cutting ports  Ken- |
|
|
|
Post by Harlock on Jul 31, 2010 0:35:09 GMT -5
Looking very nice. Even small 7 1/2" engines are big. We just finished a Chloe and it's four feet long!
|
|
|
|
Post by treinenbaas on Nov 11, 2010 20:43:10 GMT -5
hi,
I seem to be at about the same point in the build of my A3.
Have you been able to buy piston rings commercially
Gerry V.
|
|
|
|
Post by kvom on Nov 13, 2010 10:34:22 GMT -5
I am about to pull the trigger and start on a build in 1.5 scale. I have access to a CNC mill and have drawn the side frames in CAD. I am wondering about a couple of things.
1) Can I assume that the rounded upper corners of the axle box cutouts are not critical as to dimensions?
2) What's a good way to hold the frame pieces to drill/tap the mounting holes for the front bumper?
3) I am thinking of skipping the axle pump and using an injector, meaning it would not be necessary to drill the mounting holes in the left frame. OTOH, I would probably want to put the eccentric onto the rear axle before fastening the drivers in case I change my mind. Thoughts?
I will be buying the driver castings from Friends Models, and probably the cylinder castings as well.
|
|
|
|
Post by Harlock on Nov 16, 2010 21:26:19 GMT -5
The A3's boiler is large enough in 1 1/2" scale that you can just go with an injector or two. With my chloe, it has a real small, long thin boiler so it's a great relief to water management to have the crosshead pump putting in water gradually. When I am running I don't need the injector at all, I just twiddle the bypass here and there for the pump. This weekend I ran on a very hilly track and that was very useful. If I come to a stop and find out I need water, I use the injector when sitting still. but I would put that eccentric in there in case you change your mind. Remember, it's good to have at least two methods of water input. Two injectors is fine, but an injector and a pump is also great. Or two injectors and a pump!  |
|
|
|
Post by kvom on Nov 17, 2010 10:35:30 GMT -5
I am thinking about buying the cylinder castings from Friends, but might also machine them. Where did you order the 4' Durabar?
|
|
|
|
Post by ramkitty on Nov 17, 2010 11:25:53 GMT -5
|
|
|
|
Post by kenrinc on Nov 17, 2010 14:24:09 GMT -5
You can get durabar at Speedy Metals: www.speedymetals.com/pc-4289-8388-4-rd-gray-cast-iron-class-40.aspxIt may be cheaper locally (obviously) since you don't have to pay shipping but the places I found locally all wanted an exorbitant amount for a 12" piece. I just gave up and went with Speedy. Metal Supermarket is a joke. I drilled the front holes for the bumper using the drillpress. I clamped the sides perpendicular to the table and parallel to the column with a clamp. I have a 2" lip on the side of my round drillpress table. Their not long holes so if their off a tiny bit it's not too big a deal. I've got a photo somewhere, I'll try to post something later. Ken- |
|
|
|
Post by kenrinc on Nov 17, 2010 22:29:44 GMT -5
Here is what I did. I used my grinding vice on it's side, clamped down to the table. Picture explains it pretty well. You could actually drill these with a hand drill if you had to just make a jig to keep the drill straight. Ken-  |
|
|
|
Post by phutcheson on Nov 18, 2010 13:46:56 GMT -5
kom,
Thought I would suggest another method to drill/tap the side frames to the front bumper and foot step. There are a lot of ways to machine parts and this is just a method that worked for me.
I machined the front bumper/foot plate first the same way shown in fig 10-19 page 69. Paying particular attention to the distance between centers of the two groves. Then the 8 mounting holes were drilled using the tap drill (open the holes later). The grove gap (1/2" in your case) was matched to the side frames thickness. The goal was to have a tight fit if possible. Then I machined the cross tie(s) to match the gap between the side frames (5.25" 5-9/16" in your case), close as possible to maintain the side frames parallel.
Finally I assembled the 5 pieces together using clamps as need to keep every thing together. Now you can use the bumper and foot step mounting holes as a jig to drill the side frame holes. They will be exactly in the right position (all 8 holes front and back). Remove bumper and foot step, tap the 8 holes, open up the mounting holes for the screws you used. Done.
The rest of the holes in the bumper/foot step were drilled when the parts were available.
Just a thought ..
Pat H.
|
|
|
|
Post by ramkitty on Nov 18, 2010 16:13:14 GMT -5
crap  what is the weight of the frame |
|


 what is the weight of the frame