|
|
Post by siggy on May 26, 2009 18:37:13 GMT -5
I got tired of not being able to provide a good answer when people ask me "How long did it take you to make that?" when I show off a project. So, I decided to keep very detailed records of just how long it took me to make all the parts and the whole model when I started my A3.
I started a spreadsheet to log all of my shop time as I went through the build. For the coupler pocket, part 10-9, it took me exactly 5 hours of labor from start to finish.
I have numbers for all parts so if you're interested in other parts let me know and I'll pull the data from my spreadsheet.
Robert
|
|
|
|
Post by phutcheson on May 27, 2009 2:32:46 GMT -5
Siggy,
Good to hear that you are still at it ... so am I! 
Have a question about your time log ... what are your general rules for counting the time for each part?
Say for example the 5 hours for the coupler:
Does it include studying the part to determine the method build? Making the drawings?
Shop clean up?
Fixture building?
Pictures taking and associated time?
How do you handle the form and fit associated with other assemblies?
I don't keep a log but in general I counted everything except picture taking, shop clean up, drawings, pictures, ordering parts/tools and web site upkeep, etc. In short things like that. Of course I count the remaking the part ... have you noticed how much faster you make the part the second (or third) time around.  Almost cuts it in half or third!! In my limited CNC work I don't count the programing time or debugging, although I usually mention it when showing off the A3. Almost cuts it in half or third!! In my limited CNC work I don't count the programing time or debugging, although I usually mention it when showing off the A3.
I will be doing the boiler soon and was wondering how long that may take?? 
By the way, send me some more pictures so that I add them to my web site.
Thanks,
Pat H
|
|
|
|
Post by GregMiller on May 27, 2009 19:10:20 GMT -5
Robert,
Thanks for the response.
I'll have to start keeping better track of my time. I don't think that I'll have the coupler pockets done in 5 hrs, but at least I'll be in the vicinity.
Do you have pictures of your A3 posted anywhere?
Thanks,
Greg
|
|
|
|
Post by siggy on May 27, 2009 22:28:08 GMT -5
Hay, Pat, great to hear from you - it's been quite a while. My boiler build took 147.17 hours start to finish (Materials cost of $481.27). The way I track my time is to include anything that is part of creating the actual part down to the nearest 5 minute interval. So, any CAD drawings, fixtures, machine setups, silver soldering, cutting raw material, etc are all included in the number. If I have to scrap a part, the tiime I spent making the scrap is also included in my number so I believe it is fairly accurate description of the time I actually spent fabricating. Shop cleanup afterward is not counted. And, if I SS a part I also don't count the time the part is sitting in the pickling solution as build time. I do, however, count the time I spend wire brushing the part after removing the part from the acid. BTW, the materials cost includes whatever I spent specific to the boiler. So, if I need a piece of bronze rod I'll buy a 6 ft section and use whatever is needed but the whole 6 ft section is included in the cost. If I already had material on hand then that cost isn't reflected in the number. So, the key takeaway is that your cost will likely be different from mine based on your current on hand inventory and if you get exact qty or extra when you buy. Based on what has happeded to the price of copper recently all bets on cost are off anyway. As for pictures, I'll have to admit that I've been a bit lax in documenting my work lately but I have 50 or 60 new photos since I sent you the last batch. I can't remember how I got previous pics to you - did we use sendthisfile.com or some other way? Once I get them to you and you get them loaded to your site you can post a note letting Greg and others know they are up and ready for viewing. I did just post a video to YouTube showing a "time-lapse" assembly of my tender. 255 hours of tender building madness condensed down to about 47 seconds of video. Check it out at www.youtube.com/watch?v=yCCBVTk-fng . I was planning on doing the same thing for the locomotive but may not as the amount of work to actually do it would be tremendous. We'll see if I have more time than sense one day... Greg - As for other pictures of my A3, I don't think the general public can seen them anymore. I posted several hundred to Flickr but recently let my account laps from Pro status to a free account and now I can't seem to see most of my photos. The site tells me they are still there, just waiting for me to pay my $25 to renew my account. In the mean time, check out Pat's page - he has posted several pictures of my A3 build at www.phutcheson.net/Guest%20Page.htm . Robert |
|
|
|
Post by Harlock on May 28, 2009 1:57:41 GMT -5
Inspiring progress Siggy.
A3 work has all but halted for the time being while I construct parts for the Chloe and build the riding tender. This weekend we are going to CNC some new drive rods for the Chloe using the HAAS mill at work.
After the Chloe is done I want to dive back into the A3.
|
|
|
|
Post by phutcheson on May 29, 2009 13:52:20 GMT -5
Siggy,
Wow ... 147 hours for the boiler. I will probably take 200 hours. If I work on it say an average 4 hours a day 5 days week, then it will take about 10 weeks or 2 1/2 months after I start. At the rate I'm going, I might have it done by the end of 2010.  I guess I should not have asked! I better get back to my axle boxes before I get too discouraged. I guess I should not have asked! I better get back to my axle boxes before I get too discouraged.
Pictures ... yes you used sendthisfile.com. The last one was DSCN4584 about a year ago. But you can send earlier ones if you want to fill in the holes. Looking forward to seeing another 100 or so! I will post them ASAP and notify others.
I saw this video on Dan's site but smaller and without sound. It's much better with the increase in size and added sound. Would like to know more about the how to's in the creation.
Greg ... Tell us more about the A3a vs A3. What are some of major difference and where do they come from. I saw the overlay. Do you post your pictures anywhere?
Harlock ... how about a few pictures on machining with the Haas. That should be fun.
Later
Pat H.
|
|
|
|
Post by grege on May 31, 2009 21:29:21 GMT -5
Hmm- now we have two Gregs building A3a locos Pat- I did the overlay drawing, and have photos on Flickr. My user name is gregeaster www.flickr.com/photos/90015082@N00/sets/72157608204743742/I was intrigued by the same prototype photo that Greg Miller posted and then found drawings of the A3a in the Kalmbach Railroad Cyclopedia. The changes I'm planning to incorporate are the tank, longer frames for the rear bunker, and a few small details I can see in the photo. I already made an air compressor- mostly as a trial piece. I plan to mount the hand pump cross-wise in the bunker, but will probably need to see if access to the fire allows it. I've done time logs for other hobby projects, but this one is so stretched out I'm not bothering. Most of my paying work is billed hourly, so I do enough clock watching already... |
|
|
|
Post by GregMiller on Jun 2, 2009 22:45:03 GMT -5
I also referenced the A3a in the Kalmbach Railroad Cyclopedia after seeing the overlays Greg Easter made. I was able to check out the book from the local library. They did not have the book 'in stock' but were able to get it on loan from another area library. My frame is extended for the coal bunker, saddle tank will be added, and I am leaning towards propane fired rather than coal. Love the smell of coal, but like the convenience of propane. I have also added poling pockets to the front and rear bumpers to add detail and have angled the front bumper rather than rounded the ends. I looked at a lot of pictures on the 'net of front and rear bumpers, and it seems that about anything can be found. I wonder if the bumpers were often customized by the rail yards for their use. I will likely add the Scissor Hinge Cab roof that Ed Hume wrote about in Live Steam May/June 2009. I like the utility of the saddle tank locomotive and the fact that it is self contained, no tender required. It should also be a little easier to steam since the engineer (me ;D) will be sitting right behind the controls, with no tender in the way. I have not calculated the volume difference between the saddle tanks and the tender yet, but I would expect the added weight of the water in the saddle tank might help traction. My fab photos can be found on Flickr at: www.flickr.com/photos/gregrycm/sets/72157617220730278/ |
|
|
|
Post by siggy on Jun 9, 2009 19:50:08 GMT -5
Hay Pat - I sent you another batch of my A3 photos via sendthisfile.com but never got a confirmation that they had been retrieved. Usually the site shows a download count but it isn't showing anyting. Not sure if you just haven't picked up the file yet or if your email address has changed or something. Anyway, let me know if you need me to repost. Robert Here's a taste of my A3 - All done except for bending the water and oil piping. 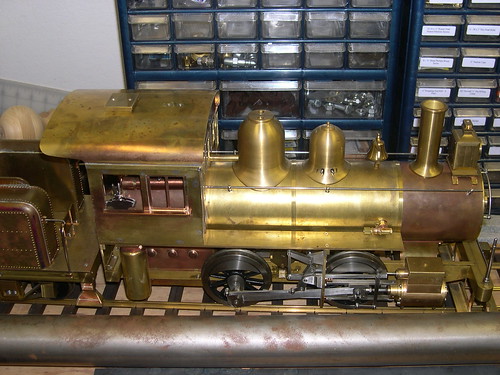 |
|
|
|
Post by Harlock on Jun 10, 2009 0:05:54 GMT -5
Wow. So close.
|
|
|
|
Post by hitandmissman on Jun 10, 2009 7:06:24 GMT -5
Beatifull work. Might I ask where you got the track you have it displayed on?
|
|
|
|
Post by pkastagehand on Jun 10, 2009 9:14:08 GMT -5
Hi Siggy, Nice looking job on that A3.
My construction has been at a standstill for a while. Other things got in the way and then I was out of the country most of May. Now I've got a couple other projects under way (like taking paint off the house) so I don't know when I'll get back to it.
Not sure I really want to start counting hours. Seems too discouraging. When I look at the whole book and see how much there is to do it scares me. Seems easier, or less daunting, to just approach it one sub-assembly at a time. When that is done I can feel I accomplished something. I guess it is a ready-to-hand project for spare time where as many are driven by the desire to have a loco ready to run.
I've felt all along and have mentioned a few times here or on other boards that I'm more interested in the process than the final product.
But that's just me; I'm not disparaging anyone else's approach. As I said above, great job and keep it up.
Paul
|
|
|
|
Post by Harlock on Jun 10, 2009 16:25:11 GMT -5
Hi Siggy, Nice looking job on that A3. Not sure I really want to start counting hours. Seems too discouraging. When I look at the whole book and see how much there is to do it scares me. Seems easier, or less daunting, to just approach it one sub-assembly at a time. When that is done I can feel I accomplished something. I guess it is a ready-to-hand project for spare time where as many are driven by the desire to have a loco ready to run. that's why I got the Chloe going with my father, so I could have a social engine that runs on the ground and will be done before I even have the tender trucks done on the A3. Now I am primarily interested in the A3 creation as a way to go through "Kozo University" and have fun making little brass parts. That was always the goal, but having another engine to run takes the edge off, because I do like running, a lot. |
|
|
|
Post by siggy on Jun 10, 2009 19:39:35 GMT -5
Beatifull work. Might I ask where you got the track you have it displayed on? I made the display track myself. The brass rail is stock LGB rail, part number 10005 that I got from my local hobby shop. The ties are cedar cut to 9/16 x 7/16 x 6 inches and then stained with Minwax Jacobean #2750 stain. I made a couple of spacing jigs from aluminum scrap to hold the rail inside to inside distace to the correct dimension and then hand spiked the rail to the ties using Micro Engineering "Large" track spikes. The ties are 1 5/8 center to center. Robert |
|
|
|
Post by GregMiller on Jun 11, 2009 18:28:39 GMT -5
Siggy,
That is a beautiful locomotive, you have to be so proud.
I look forward to seeing more construction pictures, as I think that they really help others out during construction.
Greg
|
|


 Almost cuts it in half or third!! In my limited CNC work I don't count the programing time or debugging, although I usually mention it when showing off the A3.


 I guess I should not have asked! I better get back to my axle boxes before I get too discouraged.