|
|
Post by GregMiller on Nov 29, 2009 9:52:00 GMT -5
Hello,
The Side Rods have a hole drilled and tapped for 2-56 on each end, reference Figure 13-3. What is the purpose of these holes?
The bushings are loctited in place, there is no mention of drilling through the bushing to allow for oil passage, are they cosmetic?
Thanks,
Greg
|
|
|
|
Post by phutcheson on Nov 29, 2009 14:58:03 GMT -5
Hi Greg,
I'm have been studying that drawing with the same question in mind.
I referred to Eds Hume article A Pennsy A3 builder's Report in Live Steam & Outdoor Railroading dated September / October 2006, page 22. Ed states "Kozo intends for you to drill small holes through the side rod bushing after they are fixed in position with Loctite so oil can flow through the threaded rod holes and bushing to the crankpins."
Ed goes on to say "Here, I believe that the holes are threaded to aid oil retention and not for plugs".
So I plan following Ed's suggestion. 
The only question this leaves ... are there more places that we need to have oil holes? I guess we will have to review each case and determine that.
Hope this helps,
Pat H
|
|
|
|
Post by GregMiller on Nov 29, 2009 15:28:59 GMT -5
|
|
|
|
Post by GregMiller on Dec 23, 2009 9:58:24 GMT -5
|
|
|
|
Post by pkastagehand on Dec 23, 2009 13:04:55 GMT -5
Hi Greg, Yes, it has been quiet here. I assume folks are working but not talking but maybe the holidays slow the work up a bit. My return cranks are done in the rough. Need cleaning up/polishing. Can I link to a Flickr photo from here and have it show up in the message? Here they are, along with other photos, on Flickr: www.flickr.com/photos/pa56/4209332264/ |
|
|
|
Post by GregMiller on Dec 23, 2009 13:47:49 GMT -5
Paul,
To link to a picture, sign in to your Flickr account, open the picture that your want to link, click on the 'all sizes' button which is just above the picture, select the picture size (medium), scroll to the bottom and grab the URL for the picture. Paste the URL between the IMG tags.
|
|
|
|
Post by GregMiller on Dec 23, 2009 16:24:17 GMT -5
Eccentrics are Complete and mounted on the Rear Axle. 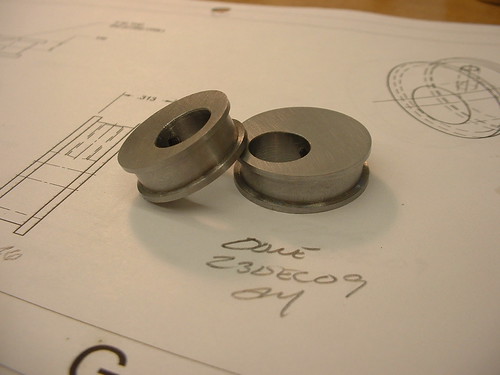 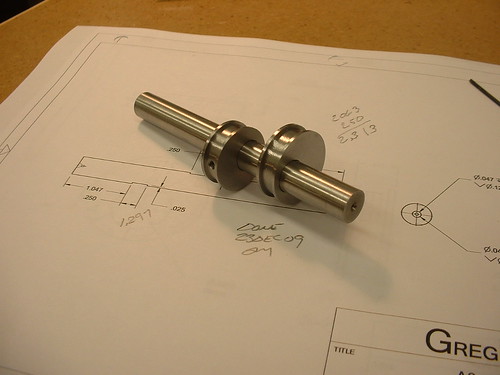 |
|
|
|
Post by pkastagehand on Jan 4, 2010 12:35:42 GMT -5
Thanks for the tip on Flickr photos Greg! Here are my return cranks, finished just before Christmas. I also have the valve rods done which I'll try to get posted sometime soon. 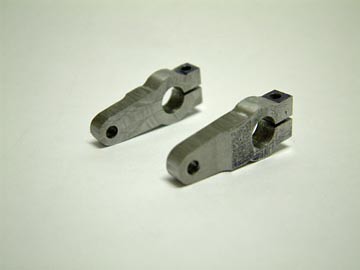 Paul |
|
|
|
Post by pkastagehand on Jan 4, 2010 17:00:34 GMT -5
Here is a shot of the valve rods. SS turned from 1/8 D. stock using a collet and single point cutting of the threads on the lathe. I didn't have a die for 2-56 and my 5-40 I think cuts too sloppy. 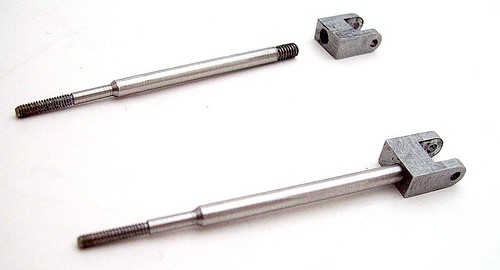 Paul |
|
|
|
Post by GregMiller on Jan 5, 2010 7:46:32 GMT -5
Good looking parts Paul.
I have not turned SS yet, how well does it machine?
Greg
|
|
|
|
Post by pkastagehand on Jan 5, 2010 12:04:48 GMT -5
Well, I had good luck with it. I can't remember for sure what grade it is but I'm pretty sure it is one of the 300 series. Folks say those can be a problem to turn but it went well. I ran around 550 rpm (actually I do much of my turning between 300-700 rpm) except for threading which was 60 rpm (as slow as the HF 12x36 goes) and brushed on a bit of oil from the last oil change in the gear head of the lathe for lube.
Can't tell you about cutting edges much since I freehand grind and do it by eyeball, don't measure anything. But it was all HSS tool bits. I also used a lantern style tool post instead of the QC post because I could get in tighter and see better. I don't know if my spindle high is a little too high for my height but I have trouble seeing around the QC tool post for a lot of this little fussy work.
Paul
|
|
|
|
Post by GregMiller on Jan 5, 2010 19:31:33 GMT -5
Paul,
I am envious. I have tried several times to grind my own HSS tooling and have yet to get the results I want in finish. I know more practice will help.
I just got a set of HSS inserts from Little Machine Shop, and they are sooooo much better than carbide inserts that I had been using.
Greg
|
|
|
|
Post by kenrinc on Jan 6, 2010 3:01:06 GMT -5
Greg & Paul your work is looking great! Keep it coming. Here is the left cylinder of my 1.5" scale version being "shaped" on the lathe. Much bigger setup than I had imagined  Both cylinders are at this point and are pretty much done. I'll be tackling the valving as Paul is doing soon. Ken- Attachments:
|
|
|
|
Post by GregMiller on Jan 10, 2010 19:00:26 GMT -5
Reverse Shaft Bearings are complete, Link Brackets are next on my list.  |
|
|
|
Post by grege on Jan 10, 2010 21:38:17 GMT -5
They look nice! Can I borrow them for a bit The rest of the reverse gear is next on my list. |
|


 Both cylinders are at this point and are pretty much done. I'll be tackling the valving as Paul is doing soon.